Improved Villagers: Organized Combat
Активный0.0
Установок
Последнее обновление
Introduction:
The Improved Villagers Mod is my humble attempt to bring a bit of martial excitement to Minecraft. I hope that you will find the implements and handles of this Mod pleasant and useful in your dreams of conquering the virtual worlds you find yourself in.
That said, the set up and use of this Mod will require some reading and knowledge, as many of the chiefest and most necessary thing that you will have to do to fully enjoy this Mod are not altogether obvious.
I have created this guide to show you what exactly the Mod is for and what it does, and how to go about using it.
Description:
The Improved Villagers Mod will, when setup up properly, allow the player to control villagers and use them as soldiers. The player must organize, direct, feed, and arm the villagers for there to be victory. There is no actual limit to how many villagers a single player can control, except that the more villagers there are, the greater a chore it is to provide for them. I have done all that I can as a humble modder to alleviate some of the pains associated with the above four tasks, but no matter what I do there will always be a limit to how many places a player can be at once and what all he can do in those places
For me, the greatest number I can keep around for guard purposes and feed at one time is about 30, that number might improve with practice, but I’m not sure.
The Villager:
The villager, without interference from the player, is little more or less than an ordinary Minecraft villager (though I have stuck my fingers into some of the vanilla working to get my Mod to work).
However...
•When holding any item, the villager will attempt to attack enemies.
•When holding an item configured in the “gunConfigFile.json” to be a ranged weapon, the villager will attack enemies by shooting them by bow or blast from a gun (provided he has the necessary consumables in his inventory).
•When holding a shield, the villager will block (blockable) attacks from enemies.
An enemy (unless otherwise configured) is …
•any descendant of the Minecraft “Mob” (hostile mob) class
•any mob listed in the mod configuration file “whitelist” (by default, a slime)
•any villager of another team (if the villager has a team)
•any player of another team (if the villager has a team).
A villager will also revenge attack any non-player entity that hurts it.
When a villager is hurt and has food in his inventory, he will regain some health by eating the food a little at a time.
A villager is generally loyal to the player who handles with him, and can join a player's team if reputation is high enough.
This Mod is also compatible with Openblocks. When a villager dies and Openblocks is installed, a gravestone will generate if the villager has items in his inventory.
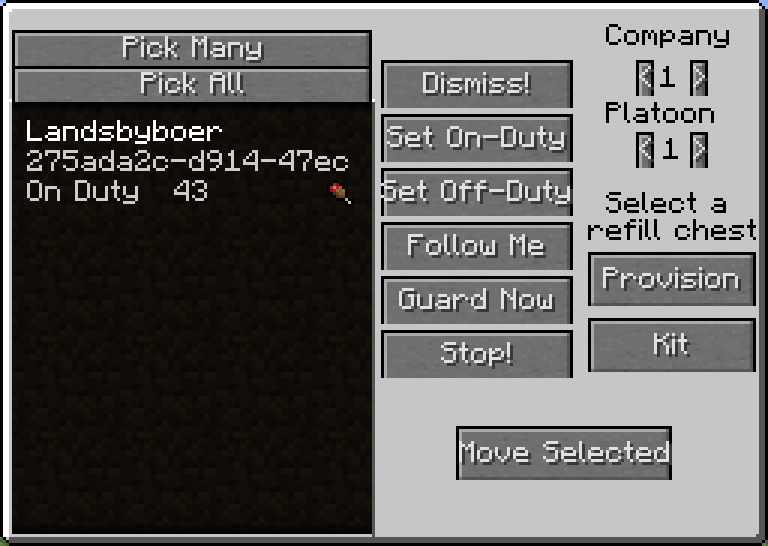
The Villager GUI:
Figure 1:
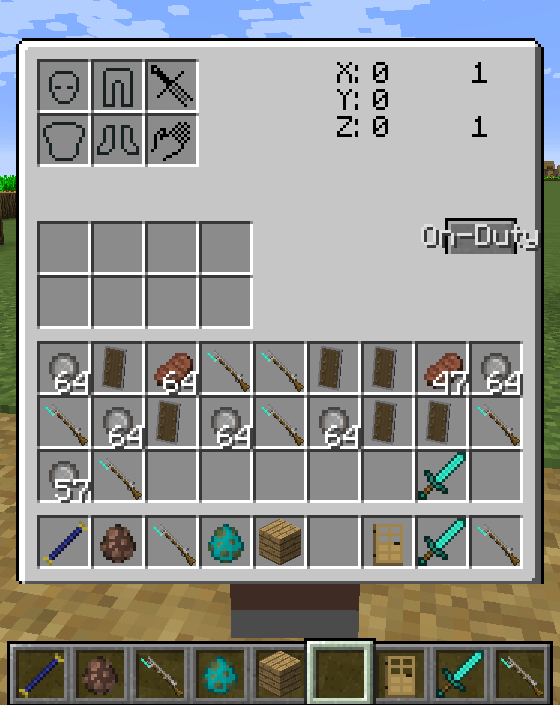
Figure 2:
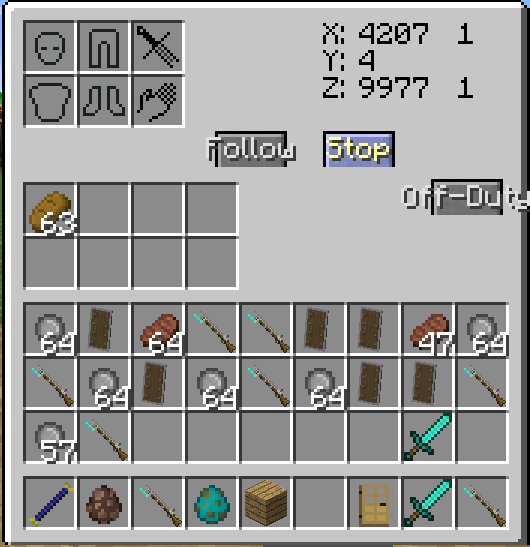
Note that the X, Y, Z coords of the guard block are shown over the "Guard"/"Stop" button
Upon sneak+right-click-ing a villager, you will be greeted with this screen provided you have not done anything to make the villager hate you (killing and hitting villagers in a village will do that).
Using this “Villager GUI” you may put food, weapons, armour, and consumables/ammo in his inventory. Doing any of these things will improve the villager’s opinion, or “personal player reputation” of you, provided you put them in their proper inventory slots.
Note also that this cannot be exploited. The improvement of reputation is based on the actual changes in inventory. If you give a villager 20 bread your reputation will go up 12. If you remove 10 it will go down by 6, etc.
Buttons:
“On-Duty”/”Off-Duty”:
When a villager has food in his inventory, you can click the “On-Duty” button. This will put the villager “On-Duty”. When a villager is both “On-Duty” and not hungry, you will be able to command the villager through this “Villager GUI”.
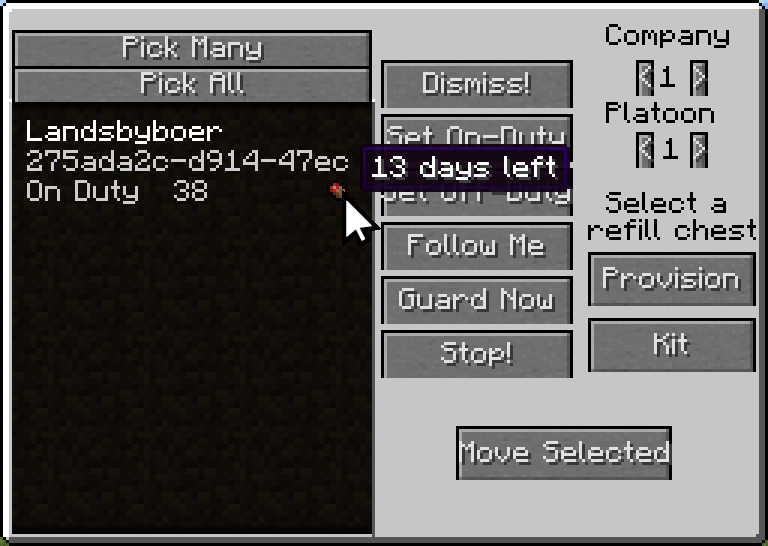
As you can see in Figure 2, when a villager is “On-Duty”, he will begin slowly eating food —faster if he gets injured. The rate is itself configurable and is equal by default to three loaves of bread each Minecraft day, or the equivalent in other food items. When “Off-Duty”, the villager will stop eating food unless he gets hurt.
“Follow”/”Stop”:
When following, the villager will follow the player at his follow distance (configurable), unless he spots an enemy, then he will pursue the enemy within a second follow distance (configurable, by default 16 blocks), from the player he is following.
“Guard”/”Stop”:
When guarding, the villager will remain on the spot unless he goes hungry, is killed, or is put off by a player who has the proper authority. The villager will stray at most 16 blocks to pursue an enemy. If the villager ever falls outside of the 16 block distance away from the guard position for any reason, he will stop everything and attempt to path back to the guard block, where he will resume his watch.
Note: a villager cannot both follow and guard at the same time. When asked to guard, the villager will guard at the block he is standing on.
“Enlist”/”De-Enlist”:
The last thing that the “Villager GUI” is used for is “Enlisting” the villager into your service. More on that later.
Villages & Reputation:
The reputation system as employed by this Mod is not directly dealt with or seen by the player over the course of his gameplay. It is still something important to be aware of, as heedlessness of the workings of this system can unexpectedly stop the player from using certain features.
If you want a short and fast summary without getting into details, just know that giving villagers stuff and killing monsters (inside of a village) will make them happy. Hurting and killing villagers will make them angry and eventually they will stop doing what you want or allowing you to open their inventory. “Enlisting” villagers requires you to give them enough stuff, kill enough monsters, or trade enough for them to like you. If the villagers like you enough and you are on a team, the villagers will join that team when you open one of their "Villager GUI"-s (this blocks players outside of the team from dealing with or commanding a villager).
If you are uninterested in any more details you can skip to the next section.
Details:
Now, for the details: as mentioned above, each villager has his own opinion, or “player personal reputation” of each player. If you give a villager stuff, your reputation with that one villager goes up. Now, most of the villagers you find in game will be in a town (for the sake of readability, I will refer to villages as towns for this section). And unless you have been moving villagers around, that town will be the home-town for all of the villagers inside of it. So, in addition to the “player personal reputation” that you have with each villager by himself, you also have a “town reputation” that goes for the whole town.
Both the “player personal reputation” held by each villager, and the whole “town reputation” rely on each other to a certain degree.
This “town reputation” is based on the average of all the town’s villagers’ “player personal reputation”. If you give several villagers lots of stuff, then you will get a good “town reputation”. This may not happen as soon as you give them these things, as the update happens at random, and is triggered by a random clock in each villager present. The more villagers there are in a town, the more your reputation will update. The “town reputation” is also based on good works done for the town, such as killing monsters inside its borders. This reputation is effected immediately. Ill deeds also update the “town reputation” immediately, such as by killing or harming villagers.
When a villager is in his home-town, that villager’s “player personal reputation” for each player will occasionally update based on the “town reputation” for that player. The “player personal reputation” a player has with a villager will change by the same amount as the “town reputation”. If a player’s “player personal reputation” is 24 with one villager, but the player then kills 2 villagers and his “town reputation” goes down by 7, his “player personal reputation” with that villager will then be 14.
If the player has a “town reputation” over 5, opening a villager’s “Villager GUI” will also update all the town’s villagers’ “player personal reputation” of that player. So, if you give out freebies and then kill a monster, your “town reputation” will go up by more than just 1. If the player’s “town reputation” is less than 0, then opening the “Villager GUI” will update all the villagers of that town in the same way, giving you an immediate negative “town reputation”.
In the following sections you will become familiar with “Enlistment”. To “Enlist” a villager, the player must not be “hated” (have a reputation of less than -10) by the town, and either the villager’s “player personal reputation”, or the “town reputation” must be at least 5.
Villager Teams:
Reputation also deems whether a villager or town will join a player’s team. If the player is a part of a team and has a “player personal reputation” of at least 5 with a villager, that villager will join the player’s team when the player opens the villager’s “Villager GUI”. If the player is a part of a team and has a “town reputation” of at least 5, the whole town will join his team when he opens the “Villager GUI” of any one of the town’s inhabitants.
As stated earlier, being a part of a team stops a villager from granting outside players access to his "Villager GUI" except when:
•the player trying to open the GUI already has a good reputation with the villager
•the villager's team is unbearable (the team has a town reputation of -7 or less)
If you move a villager to another town, that villager will still acknowledge the first town as his home-town until a certain, random amount of time has passed. How long that is depends on whether the villager likes his most recent player, or whether he is a part of a team. If a villager is a part of a team, that villager can only set his home-town to another town of the same team.
If a team ever becomes hated by a town, the villagers in that town will drop the team. "Hatred" is defined as having a reputation of -10 or less. Team reputation is calculated from the average of the reputations of the players in that team who are known to the town.
The Marshal's Baton:
Figure 3:
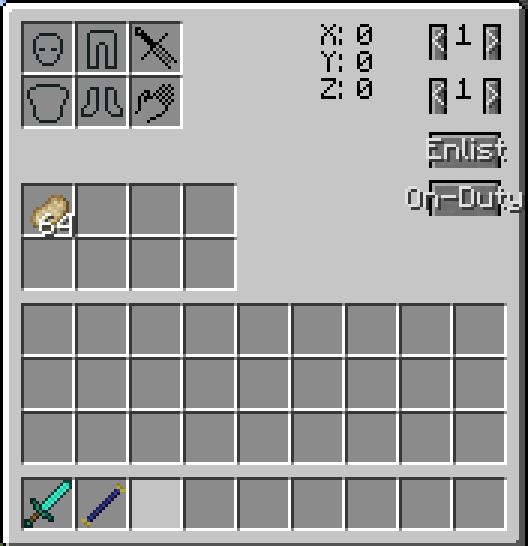
This is the "villager's GUI" when the player has a good enough reputation and a Marshal's Baton in his inventory. Note the Enlist section on the top right. The upper number is the company, the bottom is the platoon. When you have the platoon you want selected, clicking “Enlist” will enlist your villager.
Figure 4 (Crafting the baton):
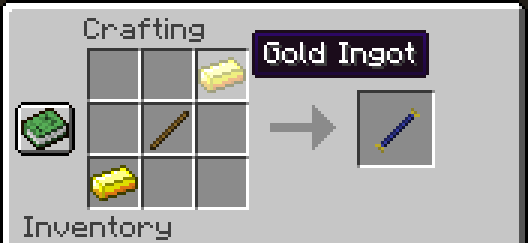
The basic idea of The Marshal’s Baton is to be able to do everything covered above in the “Villager GUI”, except that it can be done to as many as 30 villagers, all at once, at the click of a button. And if you want to do the same thing to another 30 villagers, then all you have to do is click 3 more buttons, and you will be able to do the same thing over again. You can in theory give a set of orders to as many as 100 villagers in under a few seconds. The Marshal’s Baton is also intended to allow the player to set a chest where villagers can retrieve food, weapons, and armour on their own, allowing you to feed and provision all your villagers in a matter of minutes, bar any silliness or hang ups from the villagers (getting stuck, etc).
For the Marshal’s Baton to be of any use, the first thing you must do is “Enlist” villagers into your service. To “Enlist” a villager, you must have good enough reputation as well as a “Marshal’s Baton” in your inventory. The two numbers on the top and bottom of the “Villager GUI” refer, respectively, to the company and platoon the villager will be “Enlisted” in. Dividing a force into platoons allows the player to set groups of villagers to different tasks, or order them to different places.
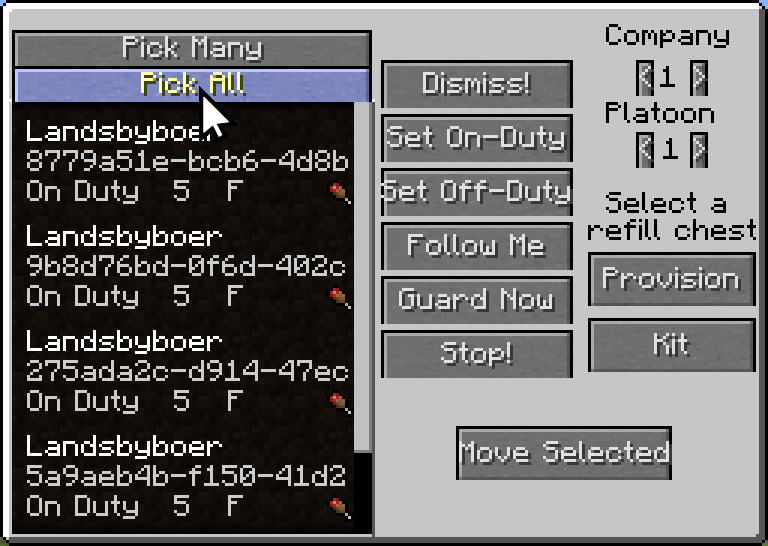
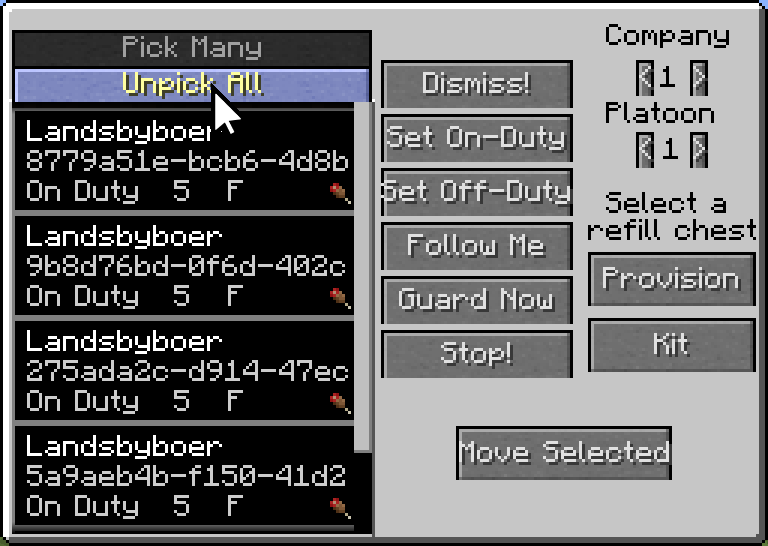
Once you have “Enlisted” your villager, you can open the “Marshal’s Baton GUI” by pressing the keybinding set in the Minecraft “Controls” menu, by default left-ctrl. This GUI is where all the fun is at.
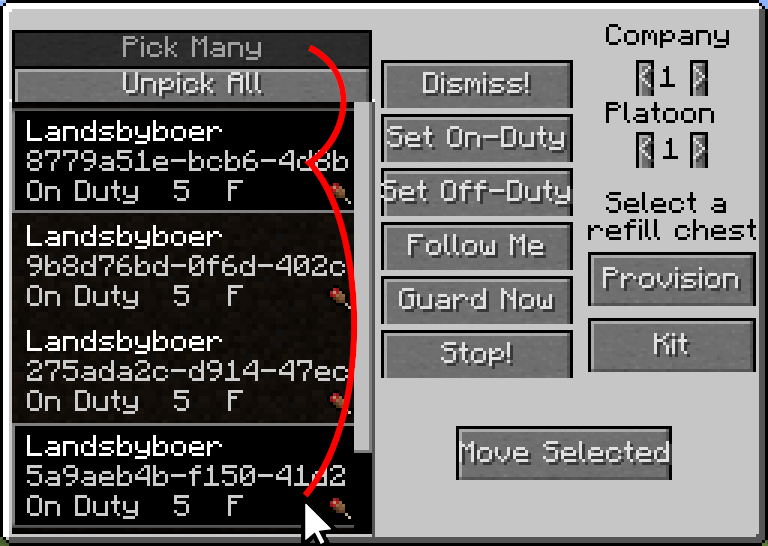
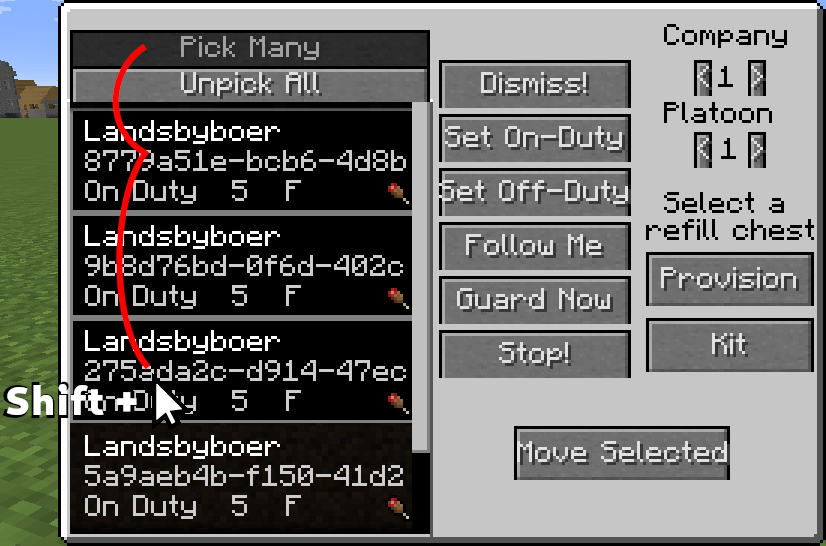
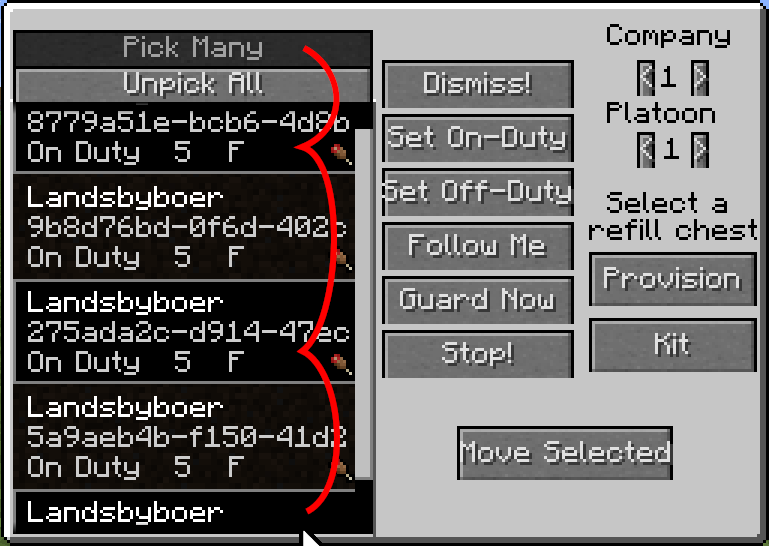
Enlisted villagers in the selected company and platoon will appear on a menu on the left-hand side of the GUI. One or many villager can be selected. Operations on the right-hand side of the GUI will be acted upon the selected villagers only, with the exception of selecting a refill chest. Refill chests are set for the whole platoon regardless of what villagers are selected.
Buttons:
Company/Platoon select:
Flips through your various platoons. 5 companies and 10 platoons for each. Most of these pages will likely be empty.
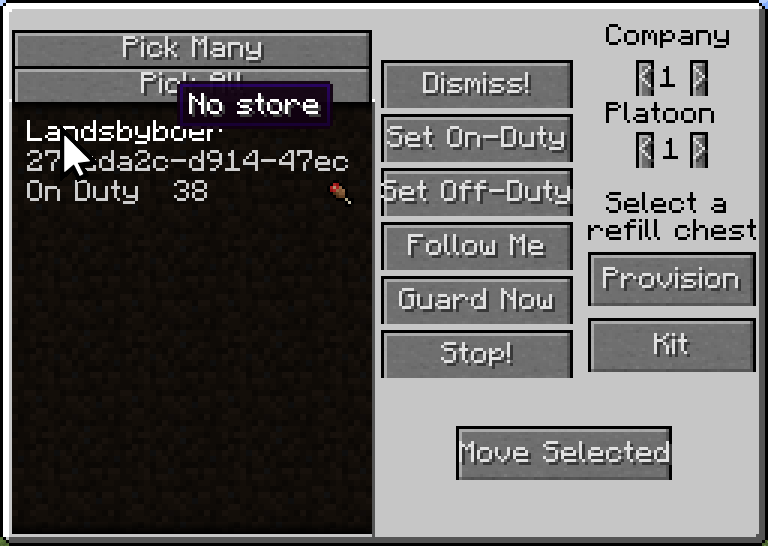
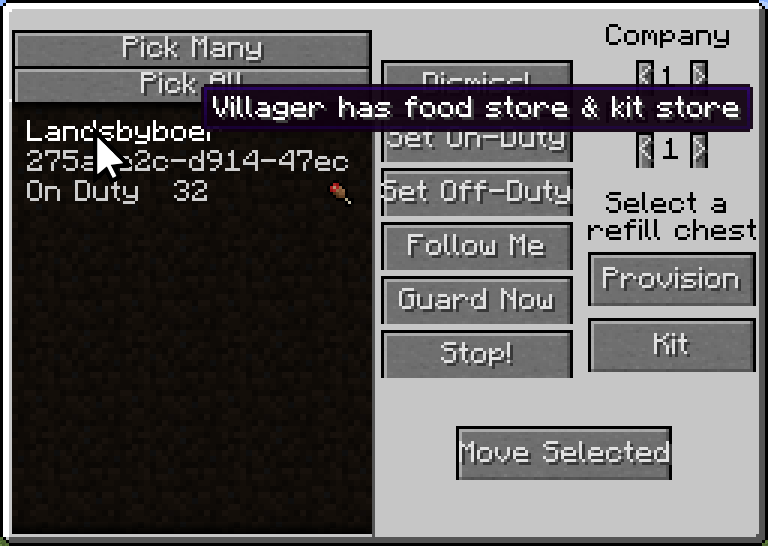
Refill Chests:
When a villager is "Enlisted" and has a refill chest, then when he either gets low on food, or “sees” a piece of weaponry or armour he does not have in a refill chest, he will try to path to the chest and replenish himself. A villager will only take food out of a "provision" chest, and armour out of a "kit" chest. When the button is pressed, the GUI will close on its own. Sneak+right-click on a tile entity (such as a chest) with the Marshal’s Baton in hand to set the chest for the chosen platoon.
Notes:
•For this to work, the villagers must be within render distance
•Kit = Weapons, shields, armour
•Provision = food
•You can also put gun ammo/consumables in the Kit chest. When a villager goes to collect these, he will also drop off any “shooting waste” (see the gun-config Readme) in this chest.
•Don’t put it at the middle of a maze, your villagers will never find it. Remember, they are using MC path finding to get there!
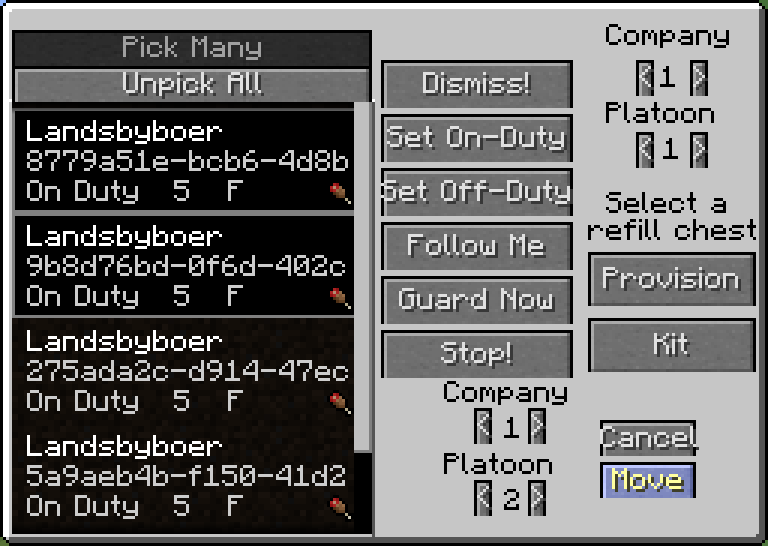
“Move Selected”:
Clicking this will open a second set of buttons as seen in the Figures below. The selected villagers can then be moved to a different platoon once the new platoon is selected and the player presses “Move”.
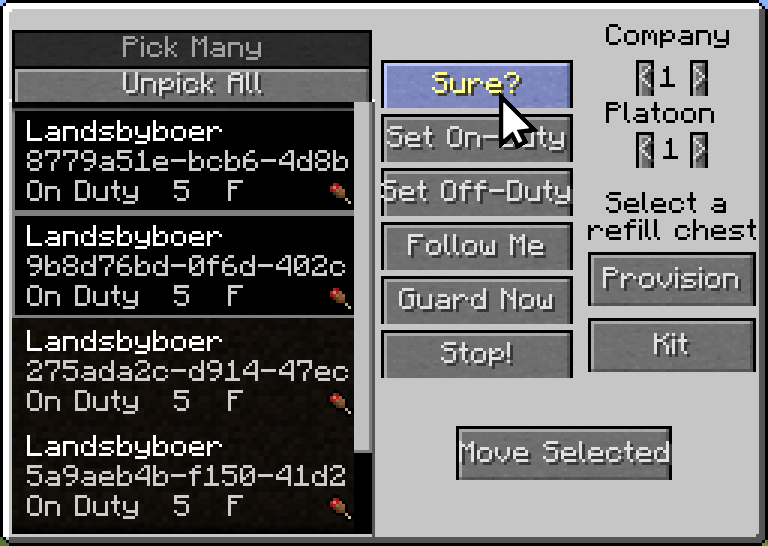
“Dismiss”:
De-Enlists the selected villagers and removes them from the list. Will ask if you are sure.
All other buttons in the right hand column work the same as they do in the “Villager GUI”. The operation is simply done to all selected villagers.
Additional Important Knowledge:
There are three last commands which are not in the Marshal’s Baton GUI, but either text commands or in the item itself. The first of these is the field command.
Right clicking with the Marshal’s Baton in hand will issue a field command to the selected platoon. You can select a platoon in game by using the arrow keys (keybinds in "Controls" menu). All villagers in render distance who are:
•“On-Duty”
•not hungry
•not guarding
•not following
•members of the selected platoon
will try to path to the point you were looking at. They can make it fairly far, but many can (and will inevitably) get stuck. Fortunately, the Marshal’s Baton GUI will tell you the distance away of all villagers in render distance for a selected platoon, so you can at least detect stragglers.
“/giveCommand [name]” – or - “/transferCommand [name]” will take regiment information (the command unit of the whole Baton) and put it in a piece of paper, named [name]. The name can be anything, and is just for keeping track. Another (or the same) player who has this paper can right click on it. The paper will be consumed and that player will assume command of all the villagers “Enlisted” to that regiment. When this command is called, all the platoon data is wiped from the player making the command. If the paper is destroyed, all regiment data goes with it. The villagers will need to be re-Enlisted one at a time all over again.
“/clearCommand” – or - “/destroyCommand” destroys all regiment information held by a player.
One final note: regiment/platoon information is tied to the player, not the Marshals Baton. Giving the Baton to another player does nothing. The information is persistent however, meaning that it carries over through deaths.
Figures 5+ (Navigating the GUI):
Configuring Villagers to Shoot Guns:
Guns can work whether you are playing a mod that adds them or not. The reason for this is that the firing of guns is handled in house by this Mod. However, before you can use them the Mod needs to know what they are, what they shoot, how they shoot, &c.
All this information is stored inside of the file: “.minecraft/config/improvedvils/rangedAttackEntries/gunConfigFile.json”. This file will generate on the first start up and will add all the muskets in the Reforged Mod by default. To add or change weapons in this file you will need to open it up and edit it in notepad or some other text editor.
Beside this Json file and in the same folder, a “Readme.txt” will generate as well. This file will tell you the details of editing the gunConfigFile.json.
The Main Config:
All the settings are fairly self explanatory. To add mobs to the “Mob Whitelist” however, you will need the resource location name for that mob. You can get this info in game by looking at a mob you want to add, and type the command “/getEntityName”. The resource location name for the mob will then be messaged to the player in quotations. You must be within 16 blocks for this to work, it will tell you that though.
Known Conflicts:
Improved Mobs messes with the villagers’ pathfinding while swimming.
Other/FAQ:
If you have a bug with the mod, open an "Issue" with it in the linked GitHub repository for the source code. You must read to see if another man has opened this issue already and if it has been answered.
Any question that is already answered above in this guide will be left alone and/or removed.
Участники проекта

Catoshy